
Help page
This web server uses several data mining (machine learning) techniques that may not be familiar to most users. This help page aims to clarify these concepts and provide a step-by-step guide on how to use the web server.
This web server uses a classification algorithm to analyse the data. A classification algorithm builds a classification model from a set of training instances. For the purposes of this server, each training instance represents a gene, and it contains a class label indicating whether or not the gene is associated with a property of interest. In our case, the class variable is the user-defined label associated with a human gene (e.g.: a human gene is associated with some brain disease). The classification algorithm uses the set of training instances to build a classification model, which is capable of predicting the class label of instances with unknown class label. Note that this web server currently supports only human genes.
Some classification models can be interpreted by the user, as it is the case of the Random Forest (RF) classification model used by this web server. Exploring this aspect of the RF model, we also present a set of predictive pruned if-then rules, extracted directly from the RF classification model to predict the user-defined class labels.
An RF is formed by combining the output of several Random Trees (RT), with each RT being built independently to maximise predictive performance. RTs use two sources of randomness, as discussed in our (future) paper. An RT is a type of decision tree, where each internal node contains a condition involving a feature and a constant (e.g.: Feature 1 > 0.1) and each directed edge represents the outcome of the condition for a given instance (gene). During the prediction phase, when an instance is presented to an internal node of the decision tree (starting with the root node, which contains no parents) the instances is passed to one of the children of the current node, depending on whether or not the condition in the current node is satisfied. This procedure is repeated until a leaf node is reached, where a prediction is made. Note that every prediction the RT makes can be "explained" by following the path the instance followed to reach a leaf node.
Each RT can be transformed to a set of if-then rules, one rule for each root-to-leaf path. Consequently, the RF model is equivalent to a set of rules. Each If-Then rule comprises two parts: the antecedent, a set of conditions involving the genes' properties (a path from the root to the last non-leaf node of a RT); and the consequent (the leaf node of the path), where a prediction made by the rule if all conditions in the antecedent are satisfied. Note that there is normally a very large number of If-Them rules in a RF model, since it contains a large number of RTs, each with typically many paths. This web server analyses the predictive power of each of those rules, and returns rules with at least a reasonable predictive accuracy, ranked in decreasing order of a quality measure (chosen by the user). For more information about how a set of if-then rules is extracted from a RF model, please refer to our (future) paper.
Step 1: Load the dataset
To load the dataset, click on the "Load dataset" button on the side panel on the left-hand side of the page. Next, select the feature type you wish to use. The feature type will be used to represent the instances (human genes).
Currently, we support 3 feature types, automatically retrieved by the system:
GTex feature types - Encoding the expression value of the gene across several tissues. The names of the features (presented later, in the interpretation phase) show the tissue and the type of expression feature. There are three types of expression features:
The absolute expression value, which is simply the RPKM (Reads Per Kilobase Million) of a gene in a tissue. The feature names of this expression feature type contain just the tissue name, e.g.: "Pancreas". The feature names of this expression feature type contain the suffix "_abs" (for absolute), e.g.: "Pancreas_abs"
The relative expression value, which is the RPKM of a gene in a tissue divided by the summation of its expression values across all tissues. The feature names of this expression feature type contain the suffix "_rel", e.g.: "Pancreas_rel".
The expression rank, which encodes the position of the tissue in an ordered list of expression values for a given gene. Rank 1 indicates the greatest expression value. The feature names of this expression feature type contain the suffix "_rank", e.g.: "Pancreas_rank".
Gene Ontology (GO) feature type - this feature has the value "1" for a gene-GO term pair if the gene is known to be associated with the GO term, or "0" if the gene is not known to be associated with the GO term.
Protein-Protein-Interaction (PPI) feature type - this feature type encodes, for each gene, the list of proteins that interact with the products of the gene. In practice, a value "1" for this feature indicates that the gene (or gene product) interacts with a given protein; a value "0" indicates that there is no evidence for that interaction.
After the feature type is selected, you can either manually enter the gene ids. of the training and testing instances or select a pre-configured training and testing set.
In either case, the instances in the training set must be input one instance id (human gene Entrez Id.) per line. The first piece of information in the line must be the Entrez Id. of the human gene, followed by an optional comma and the class label (any string) of the gene with that Entrez Id. If the class label is not supplied, the label "Y" is assumed.
Important: A class label must annotate at least 10 instances to be considered by the classification system and there must be at least two valid class labels. Also, the dataset must have at least 30 instances in total.
Example of a list of training instances (gene Entrez Ids. with class labels):Finally, you can optionally enter the Entrez ids. of genes used as "testing instances" which will be classified by the classification model. These instances do not need to be associated with a class label, being simply a list of Entrez Ids., one Entrez Id. per line. Note that if the same Entrez id. appears in the testing and training sets, the entrez id. in the testing set will be ignored.
Example of a list of testing instances (gene Entrez Ids.):When you are happy with your dataset definition, you can click on the "Prepare dataset" button. After some short time (maybe a few seconds depending on the dataset size), the statistics of the dataset you just created will be displayed. You can review this information by clicking on the "Dataset statistics" button.
Step 2: Generate the Random Forest Model
This is the simplest step: just click on the "Train model" button on the panel on the left-hand side. Next, click on the "Start train" button.
Step 3: Analysing the results
Predictive results
After the model is trained (this may take some minutes or more depending on the size of your dataset) the "See predictive accuracy and testing results" button and the "See If-Then rules" buttons will be enabled.
If you click on the button "See predictive accuracy and testing results", you will be able to see predictive accuracy measures and the class label probabilities predicted for each gene (instances) of the testing set (if the testing set is provided). You can order the list of predicted gene labels by their entrez id (the default criterion) or by the predicted probability of individual class labels.
Rules
Finally, if you click on the "See If-Then rules" button you will be able to see a list of high-quality If-Then classification rules extracted from the Random Forest model. Each rule contains in its header the rule's number (the rule's rank according to the current sorting criterion) and the class label being predicted by the rule. Recall that each rule predicts the class label in its "then" part for each gene satisfying the conditions in the "if" part of the rule.
Next, we show 4 statistics for each rule, respectively:
- the number of correctly classified instances minus the number of incorrectly classified instances (the default sorting criteria),
- the number of hits (the same as the number of correctly classified instances),
- the coverage (the number of instances satisfying the conditions in the rule), and
- the precision (hits divided by coverage).
Next, we show all conditions in the "if" part of the rule. For more details on how these conditions were extracted, please refer to our (future) paper.
We show the list of genes (identified and sorted by their Entrez ids.) that were covered by the rule. We also show the class label of the covered instances in brackets.
In the following figure we show an example of a rule generated by the server.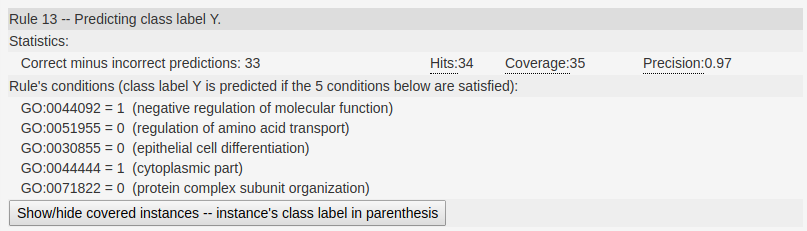 In this rule we can see in the main header the class label this rule is predicting (class label Y).
Next, we show the statistics regarding the performance of the rule, as previously described.
Next, we show the rules condition, one condition per line. In this particular example, this rule captures genes
that are not annotated with the GO terms GO:0051955,GO:0030855, and GO:0071822; and are annotated with class labels GO:0044092 and GO:0044444.
In this rule we can see in the main header the class label this rule is predicting (class label Y).
Next, we show the statistics regarding the performance of the rule, as previously described.
Next, we show the rules condition, one condition per line. In this particular example, this rule captures genes
that are not annotated with the GO terms GO:0051955,GO:0030855, and GO:0071822; and are annotated with class labels GO:0044092 and GO:0044444. The analyses of this rule may give rise to interesting biological insights.
Exporting results
The server is capable of exporting a zip file with the results presented in "Step 3". To do that click on the "Download the result" button. Please refer to the read-me file in the zip for further information.